Make the decorative part of an iPhone 18 crochet bow case from simple pieces: one rectangle joined into a bow loop, two narrow tails and a small centre band. The example uses ivory yarn, which stands out against a burgundy or dusty-rose fitted cover.
This is an original pattern recipe for the bow applique, not for the fitted phone-case shell. The arithmetic has been checked, but the project has not been physically tested on an iPhone 18 Pro or Pro Max. Adjust the finished bow to your paper layout and actual case. For camera clearance and cover planning, read the fitted iPhone 18 crochet bow-case design guide.
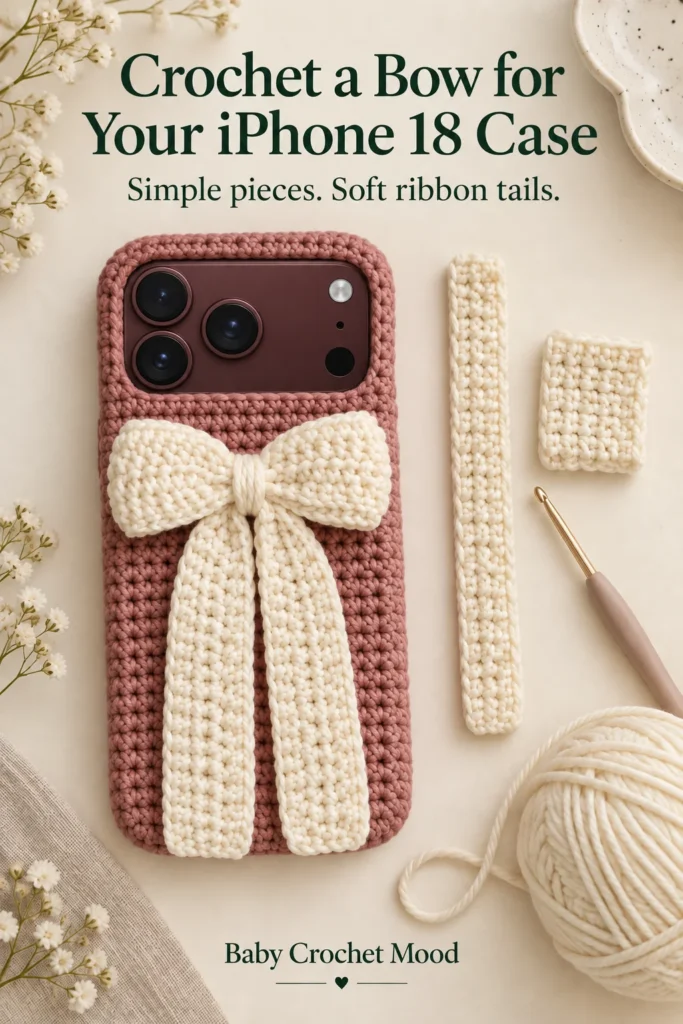
Measure the space below the camera first
Place your empty, model-specific case back-up on the table. Mark where the lower edge of its camera opening sits. Cut a paper rectangle for the bow and two paper strips for the tails, then arrange them underneath that boundary. Leave enough separation for the soft fabric to move without crossing the camera area.
The bow width should stay within the back of the case, and the tails should finish above its bottom edge. Check the arrangement against the Pro or Pro Max case you will actually use. A long tail that looks attractive in a photo may fold around the bottom or sit under your fingers in daily use.
Materials and stitch terms
You need a smooth yarn, a suitable hook, a ruler, scissors, a blunt yarn needle and a few stitch markers. Keep some matching yarn for the attachment stitches. Use a hook that makes a fabric you can fold and pinch comfortably. A rigid, overly tight swatch can make a bulky bow centre.
These instructions use US terms: ch means chain and sc means single crochet, called double crochet in UK terminology. The turning chain does not count as a stitch in any piece below. See our single crochet lesson and the Craft Yarn Council abbreviation reference if those terms are new.
Choose the size from a washed swatch
Wash and dry a single-crochet swatch according to the yarn label. Measure stitches per centimetre, g, and rows per centimetre, r. Let B be the desired width of the flattened bow loop, and A its height. The starting rectangle is approximately 2B wide and A high, because joining the short ends creates a ring that flattens to about half the rectangle’s width.
Calculate rectangle stitches as 2B × g, rounded to a whole stitch, then add one chain for the foundation. Calculate rows as A × r, rounded to a whole number. Joining and pinching can change the final dimensions slightly. Adjust the rectangle before fastening the assembly to the case.
Teaching example: at 25 sc and 30 rows per 10 cm, g = 2.5 and r = 3. A rectangle 12 × 3 cm uses 30 sc across and 9 rows. Once joined and flattened, it is approximately 6 cm wide before pinching. That is an example to compare with your layout, not a promised fit for every case.
| Piece | Foundation | Rows and stitch count | Predicted size |
|---|---|---|---|
| Bow rectangle | 31 chains | 9 rows of 30 sc | 12 × 3 cm before joining |
| Long tail | 5 chains | 24 rows of 4 sc | 1.6 × 8 cm |
| Short tail | 5 chains | 21 rows of 4 sc | 1.6 × 7 cm |
| Centre band | 3 chains | 2 sc per row; length fitted around the assembly | About 0.8 cm wide |
Crochet and join the bow rectangle
- For the example, ch 31. Make the first sc in the second chain from the hook, then sc into each remaining chain: 30 sc.
- Ch 1 and turn. Sc in the first stitch and every stitch across, keeping 30 sc.
- Repeat that row until you have 9 rows in total. Fasten off, leaving enough yarn for the short joining seam.
- Bring the two short edges together without twisting the rectangle. Sew corresponding row ends with a flat, edge-to-edge seam to form a ring.
- Flatten the ring with the seam at the centre of the back. Pinch the middle into a small accordion fold. Secure that pinch with a few passes of matching yarn.
The two sides of the flattened ring become the bow loops. Keep the joining seam behind the centre so it is hidden by the band. If the bow is too wide, shorten the rectangle and rejoin it; pulling the centre tighter cannot reliably correct an oversized piece.
Make two long ribbon tails
For each example tail, ch 5. Work 4 sc across the first row, beginning in the second chain from the hook. Ch 1, turn and keep 4 sc in every following row. Stop at 24 rows for the 8 cm tail and 21 rows for the 7 cm tail, or use the lengths from your paper layout.
These instructions produce simple rectangular tails. The soft rounded appearance in the concept image is illustrative, not a separate shaping instruction. If the tails reach too far down the case, undo rows from the top end before assembly. Do not trim through finished crochet stitches with scissors.
Weave in the lower ends. Place the upper ends behind the bow centre at slightly different angles, with the longer tail on the side you prefer. Secure each upper end to the back of the pinched centre so neither tail relies solely on the outer band to hold it.
Wrap the centre band
Ch 3 and make 2 sc in the first row. Continue with ch 1, turn and 2 sc per row. Check its length around the pinched bow and tail tops as you work. Stop when the ends can meet at the back without crushing the centre or leaving a loose loop.
Fasten off with a sewing tail. Wrap the band around the centre, join its short ends behind the bow and make a few securing stitches into the back layers. Keep the stitches hidden from the front. Shape the loops with your fingers rather than stretching them forcefully.
Sew the applique to a fitted crochet case
Position the completed bow on the crochet cover with the phone removed. Use the camera boundary from your paper layout to check the spacing again. With matching yarn, sew through the back of the bow centre and the crochet cover at several points, then tack the backs of the loops so the bow cannot easily rotate upward.
Keep the attachment within the textile layers. Do not stitch through the phone, put hard fasteners between the phone and its rigid case, or glue the applique directly onto the handset. The bow and tails are decorative; they are not a strap, grip or lifting handle.
Finish with a clearance check
Refit the decorated cover and check that both bow corners remain below the camera area, the tails stay above the bottom edge and the case seats normally. Check buttons, side controls, speakers and the charging port. Remove the decorative cover if it interferes with use, charging or a magnetic accessory.
Save the final rectangle dimensions, tail row counts and band length with the yarn label. They will help you recreate the bow in another colour without guessing. Continue with the iPhone 18 crochet bow-case fitting guide for the cover layout, or review the swatch guide before changing yarn.