A crochet symbol chart shows where stitches sit in relation to one another. Once you can recognise a few marks, a shell, corner or decrease is often easier to understand in a drawing than in a long sentence. Begin with the chart’s own key: the symbol tells you the movement, while its position tells you where that movement belongs.
Stitch terminology: This guide uses US names. US single crochet is UK double crochet; US half double is UK half treble; US double is UK treble. See the full US/UK reference.
Learn the marks you will actually use
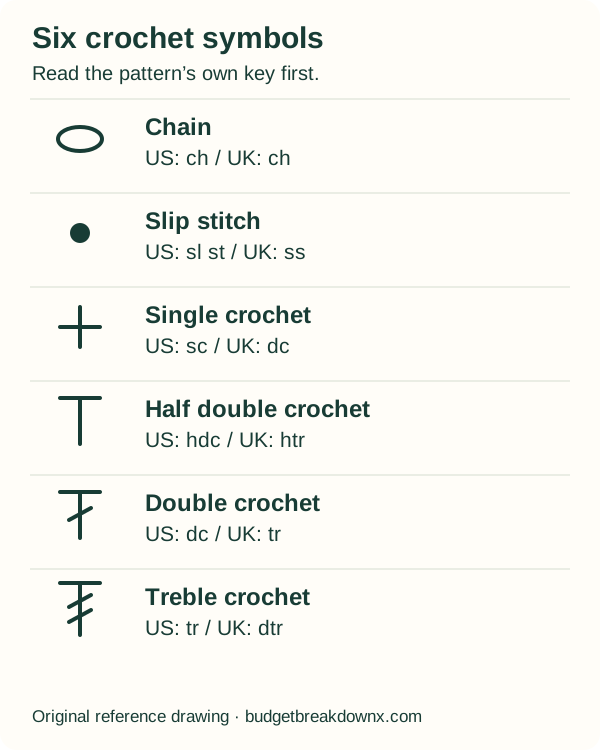
| Common symbol shape | US stitch name |
|---|---|
| Small oval | Chain |
| Small solid dot | Slip stitch |
| Cross or plus sign | Single crochet |
| T with no diagonal slash | Half double crochet |
| T with one diagonal slash | Double crochet |
| T with two diagonal slashes | Treble crochet |
These descriptions are an introduction, not a replacement for the printed legend. Publishers can use additional marks for special stitches. A cluster symbol may also specify a particular number of partial stitches, so count its branches rather than guessing from its overall shape.
Find three things before making a chain
Locate the starting point, the direction of travel and the repeat boundary. A flat chart normally begins at the bottom, while a motif chart often begins at its centre. Row numbers, arrows or contrasting colours can identify the route. Do not assume the bottom-right corner is the start of every chart.
For turned rows, the reading direction usually alternates. Follow the row numbers from one edge to the other. For rounds, look for the join and the chains that lift the work to the next round; they may be drawn very close together.
Read the base of each symbol
Several tall symbols spreading from one point mean several stitches enter the same place. Several symbols joining at the top usually indicate stitches completed together. These are different operations: the first can increase the count, while the second can decrease it.
A symbol floating above a chain arch may be worked into the chain space, rather than a particular chain. Check the written notes if the drawing does not make that distinction clear. The apparent width of an arch on the page does not tell you how many chains it contains.
Translate a small section into a checklist
Imagine a teaching chart that shows four repeated groups, each containing three double crochets and a chain-two space. Your checklist is twelve double crochets and four chain-two spaces. If you make twelve tall stitches but only three spaces, the round still needs checking.
Mark the first group and count groups separately from individual stitches. This is especially useful when a chart has corners: a side repeat may look similar to a corner but contain fewer chains.
Handle left-handed charts and lettering carefully
Reversing the direction of a stitch chart can help a left-handed crocheter follow the movements. However, automatically mirroring a picture chart containing words will reverse the letters too. Decide which side of the finished fabric must display the design, then map the first row accordingly.
Work a small, deliberately asymmetric sample before starting a large word or image. An arrow is a better orientation test than a symmetrical heart.
Keep your place without covering the information
Use a removable marker or ruler beneath the current row. Leave the row below visible, because it identifies the insertion points. After each repeat, compare both the stitch count and the shape on your hook with the chart. Correcting a misplaced group now is much easier than finding it after several rounds.
Continue learning
Understand repeat arithmetic · Adapt a left-handed reading route · Read written instructions
Browse the crochet learning library.
Try a four-stitch practice chart
Use this small exercise to connect a symbol to a counted stitch. You need a little smooth yarn and a suitable hook. It is a counting exercise, not a sized project or a photographed, sample-tested pattern.
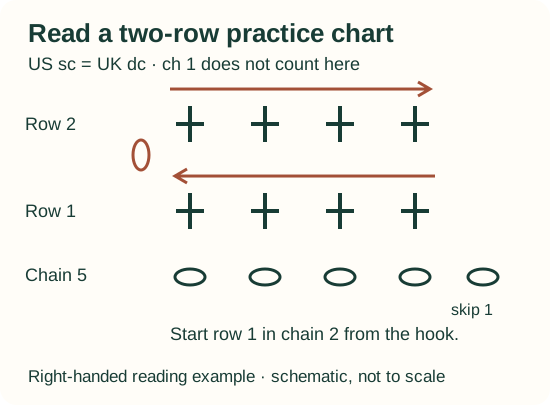
- Foundation: chain 5. The loop on the hook is not one of the five chains.
- Row 1: make US single crochet (UK double crochet) in the second chain from the hook, then once in each remaining chain. Count 4 stitches. Follow the lower arrow from right to left.
- Turn: chain 1 and turn. That chain is a lift only in this exercise.
- Row 2: work once into each of the four actual stitches. Read the upper arrow from left to right. Count 4 stitches again.
The chart contains 8 completed single-crochet stitches across two rows, five foundation chains and one turning chain. These are different counts; do not add every printed symbol to get the row width.
My second row has 5 stitches. What should I check?
Look for a stitch worked into the turning chain, or two stitches in the same top V. Find the four actual stitches in the previous row before undoing or adding anything.
My second row has 3 stitches. What should I check?
Locate the first actual stitch beside the turning chain and the last stitch at the far edge. Either can be missed. A removable marker at both edges can help you keep the same four-stitch width.
For hand-movement practice, open the six-lesson beginner coach. For a lettering grid, try the name-chart planner: a colour grid is read using its chosen technique, not as a stitch-symbol chart.
Learning resources reviewed 18 September 2026. Diagrams and calculated examples are instructional; we have not physically crochet-tested these samples. How our guides are made.