A useful baby bonnet pattern should tell you where to measure, which stitch system it uses and how the fabric is joined. Here are two free patterns published by their original designer at Daisy Farm Crafts, with the differences that matter when choosing a starting point.
This page is a comparison and preparation guide. Follow the complete instructions, updates and photographs on the designer’s own page. We have reviewed those pages; we have not made or fit-tested these bonnets ourselves.
Compare the two free patterns
| Pattern | Technique to practise first | Published materials | Help included |
|---|---|---|---|
| Kate’s Crochet Newborn Bonnet | Single crochet in alternating front/back loops; slip-stitch ribbing | Light / #3 Bernat Softee Cotton; 4 mm hook | Written instructions, video and printable on the designer’s page |
| Crochet Cluster Stitch Baby Bonnet | Single crochet and the designer’s dc2tog cluster | Medium / #4 Patons Canadiana; 5 mm hook | Written instructions, video, gauge information and printable |
Which pattern should I open first?
- You can already chain, slip stitch and count a row: open Kate’s design and check its mixed-loop instructions before starting.
- You want to learn a textured cluster: open the cluster bonnet and watch its special-stitch demonstration. Its dc2tog cluster is made in one stitch, so do not substitute a decrease worked across two stitches.
- You have not made a counted row yet: start with our 10-stitch practice lesson. A bonnet adds fitting and joining decisions.
Choose the fabric you want to practise
Kate’s design is a useful option if you want to learn how changing the loop you work into changes a simple stitch texture. The cluster design suits someone ready to manage several loops on the hook. Its special cluster definition matters: a stitch with a similar name in another pattern can be worked differently.
Both pages begin with brim construction, so watch that part of the linked video before buying a substitute yarn. Do not combine one pattern’s brim count with the other pattern’s body instructions.
Check fit information before starting
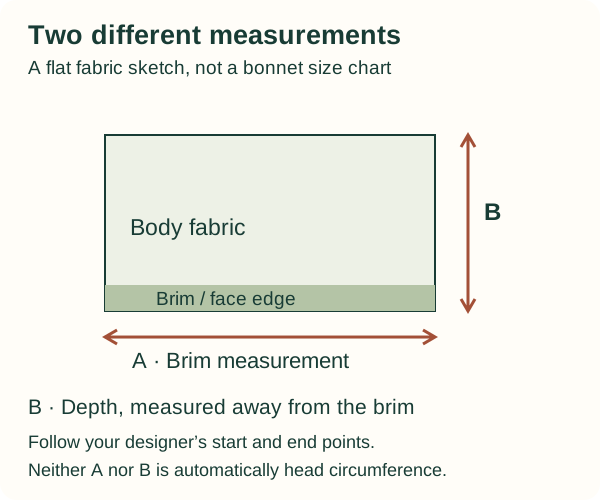
A newborn age label is not a measurement. Read how your chosen designer measures the brim and depth, then use the same measurement path. Face-opening length, crown width and head circumference describe different things; substituting one for another can give the wrong fit.
Make the gauge sample in the exact stitch named by the designer. Wash and dry it according to the yarn label. If your stitch or row count differs, adjust and repeat the sample before copying the pattern’s counts. When a size you need is not fully specified, ask the original designer or choose a pattern that explicitly includes it.
Use a pattern-selection worksheet
Download the one-page bonnet notes (PDF). Keep your source URL, yarn, swatch and measurement points together. The sheet does not calculate a baby’s size.
- Open the original designer page and choose its stated size and stitch system.
- Copy the gauge instructions exactly, including the stitch being measured. An unstated gauge is “not stated”, not a number to guess.
- Make the named sample and write down both stitch and row measurements. Record your own result separately from the pattern target.
- Compare the same measurement paths. On the cluster page, the designer asks you to recheck the brim after initial body rows because it can change length.
- If the result does not match, revisit the designer’s adjustment advice or choose another fully specified size before making the entire bonnet.
The Kate’s bonnet page specifically cautions about tie length and strangulation risk. Decorative ties do not establish a safe fit. Read our baby crochet intended-use and safety guide before selecting an accessory.
Learn the skills first
Use our six-step beginner coach to practise single crochet, then keep the US/UK terms reference beside the original pattern. For the visual style, our vintage bonnet yarn and finishing guide helps you evaluate colour, drape and edging without guessing a new size.
Links, material details and comparison checked 18 September 2026. The designers retain their patterns, images and videos. This comparison is independently written and is not a collaboration or endorsement.
Learning resources reviewed 18 September 2026. Diagrams and calculated examples are instructional; we have not physically crochet-tested these samples. How our guides are made.